4/19/2013

Gatherer/hunter

Heyhey, it's been a while. I've been superbusy since our fleet of cars has completely renewed, except of course for the Probe. So there's been a lot of stuff and also I've made a few jobs for my friends here and there, only got like 2-3 days on the Probe since last post. Also we dropped by Rome and are heading to NYC next month, which is eating the crumbs of Probe's sad little budget but especially since we won't have access to cheap flight tickets anymore after next month, it's well worth it & justified.

I've been able to gather necessary stuff for the Probe quite a lot, should keep me busy for a month or so, so I guess I could show you what I got so far.


Most of the RPi stuff is here at last, still missing a few bits. Here's the Raspberry, Numpad for working it, USB hub for sticks and stuff, a new welding station I found and a breadboard so I can try out a electric schematic I've made. I want the Raspberry to automatically detect when the key is turned off and turn itself off automatically, and since it's a PC it needs to go to shutdown on itself as well. Well that's pretty much solved, just need the bits and pieces.

Also there's a amplifier wiring kit, still missing a lot of cabling but that was the only real money hole there.


Actually got this stuff earlier, there's Raspberry stuff mostly. Also a DVB-T digibox I got since I wanted a radio for my car and the ad said it had one; turns out it has only the digital radio DAB which is useless in Finland. Also, I discovered a normal digibox doesn't work well when the car is moving, so it's not going in after all, shame. Oh well only 20€ for a recording digibox, thank you anyway China. :D


Just today I got some carpet for the floor and trunk. Swheeeet! It's actually a bit more tinted to red wine than what it looks like in the picture, but I think it's still red rather than burgundy so I'm cool. At least it's not orangeish.


Here's my paps power tools and some wood I finally got my hands on. Now I can start building the trunk rig and new floor panel. That should be the next project.

Also, some pics of things I've been working on;

This is a 230V AC --> 12V DC power supply custom install I made so I can try all the LEDs and gadgets before putting them in the car. Girlfriend approved it in the house. ;)


Also here's the paint operation I finished a while back for my friends car fender, it turned out to be probably the best paint job I've ever done so I wanted to share it with you. Near flawless, even though I had to do it with aerosol and in our dusty and dark garage.


So that's that. As you might see, I'm not even in the middle point so might be that I won't drive the Probe this summer, but I don't think I want to either, not without the interior done. Because it would be pretty easy to wrap it up now and just drive for the summer, but I think I'll rather keep working on it. The budgets tight as you know so it's taking a long long time to get things done..

But we'll get there eventually!

Expect some work pics next time.

2/16/2013

Bit by bit

Another day spent at the garage, doing the stuff I've already bought parts for.

I put new LEDs in the place of the old ones, to all the buttons in the steering column frame. Sadly, as I thought the new ones are just as white as the old ones were, I'd preferred them to be a bit blue because all the other led lights in the car are so as well. Oh well, LEDs have come a long way in the last few years, you just don't see blue tinted whites out there that much.

You can see the white glow on the bottom side of the pic, didn't bother with that photo too much as you've seen them before. :) I accidentally teared off a slice of copper film off the circuit board of one of the switches so reparing that took me pretty much whole day, but I did get something else done as well.


Here's the clock I've been storing for a while in my boxes, turns out it has a battery on the backside to keep time when not powered so it is actually a good clock for Probe! Ordered cheap from eBay, about 10$ if I remember correctly.


Here's the place for it. :) My Dremel is shot so I had to get creative with making the hole, we had some milling drill bits in the garage, I used them in a bench drill machine and moved the plastic with my hand, finished with file. :) For once I didn't screw up! ;)


Also, I took off the rear seat and we started tearing it up, my love decided she wanted to contribue and sew new fabrics for them. :) Niiiice. B)

So yeah, that's that, little by little. :) I purchased a Toyota Carina 2 1.6 for a hundred euros, that needs a bit fixing so it'll eat my time for a while but at the end of the day I'm expecting some profit from it so I might get some of the stuff Probe wants also. Perhaps soon you will have more bigger things to read about. :P

Yeah, keep it cool :)

2/11/2013

Engineer with no hands


So, I've been spenting quite a lot of time at the garage lately. As you know, I'm in process of installing the screen.

You've probably seen my first two desings of anti thief measumerents,


Mark I, the flipping screen. I abandoned this idea when I removed the cover plates of the DIN holes. There is a big bracket inside, cutting it would compromise the strength of the assembly and I would have to replace all the relays and wiring inside. Not worth it.


Mark II, the screen in a box. The idea was that the screen was attached from the rear base, middle section, to the plate leaning against the box in the picture. With those rails, it would move in and out. Unfortunately, the finished product didn't surpass my quality check; the rail would get stuck, the box was too tight at the inside end and excess amount of force was needed to operate. NEXT!


At this point, I decided I was simply going to put the screen in the 2 DIN space, after trying it and seeing how good it looked there;


I wanted a cover plate to fool the thieves though, and there was a big gap between the body of the middle console and the frame of the screen. To this gap, I fabricated aluminium frames. I installed neodyne magnets inside the frames so that my new cover plate would just SNAP ON! ;)


I glued the magnets inside. In the other pic, you can see the tiny magnet easily holding a heavy screwdriver, so they're pretty powerful. :)


Here's the brackets installed,


After rigging some aluminium plate to the inside of the din holes so I could screw the screen on, I went with Mark III and IV cover plates. I don't have pictures of those, as at this point I was getting quite frustrated and simply looking to get the job done.

Mark III was 2 DIN sized metal plates, joined with hinges from middle and held place with other hinges in the bottom. It would down and over itself in a neat pile. Or should've, but I didn't take into account that the hinges itself would raise the plate so much, that there would be big gaps all over, which would've looked stupid and not fool anybody. Besides, at this point, I found out that even the supermagnets couldn't do anything through 1,5mm of aluminium and 2mm of plastic. They barely held a small screw against the frame. So that was all for nothing.

Mark IV, I went back to basics. Just one simple 2 DIN size plate, hinged from bottom. It would be held up by a knob, which would be a switch. When you flipped the switch down, the plate would come down and the switch also powered the screen. This one I built and painted, but upon assembly I realized the screw heads holding the plate hinges to the frame of the screen, made it impossible for the hinges to close completely, leaving the plate open, now matter how I tried bending the plate, it just wouldn't look good.

So Mark V came around, just a plate, no hinges no nothing, a simple U rail to hold it in place. At this point I was almost ready to pick up the grinder and cut the screen in half.

Suddenly, I came to find out that the little guy living inside me, who couldn't cut a straight line with a saw in junior grades, hadn't gone anywhere. Trying to cut a 2 DIN size plate which would even seem straight turned out impossible. After wrecking 2 perfect pieces of aluminium and one steel plate I just fucking gave up. :D

I melted some plastic with a soldering iron to holes I drilled (it fucking worked!) It's not perfect for a first try out, but to me it looks a lot better than the holes. Needs some paint though. I later found out this is an actual practice and not a new invention by yours truly.

Now I'm totally out of money, need some more aluminium rail to get it back to how it was before I drilled a thousand holes, so I expect nothing great to happen in two weeks. I should be getting some deliveries, though. ;)

So hear ye thieves, come and steal, I'm insured. Maybe I should attach a price tag to the screen to keep the thieves away, after all, this screen only cost me like 30 euros.

I will avoid fabricating items from now on, thank you for the lesson. ;)

although, I've planned the Mark VI already...

1/29/2013

Got some

Well it's been a while, I grief that I'm not progressinn with the Probe, but problem is, I am really dead short of buck. As some of you may have read, I've been to school for the last few months and will be until the end of the year to study to be an eletrician. So there's not a lot of money to spend on Probe this year.

However, I did some shopping and bought some wood for the brackets to the trunk, so I can start installing the woofer and amps there. I've also been building a rig for the screen, despite my previous plan I decided to go 1 DIN size rig so I can use the other DIN space for something nifty like a cup+drawer tray combo.

This is how it turned out;


Pretty nice, eh? Well it's garbage, the rails get stuck from time to time, there's not enough space in any direction so it's really tight to put the screen in. I wasted about 10 hours on designing and assembling this, as there were a lot of un foreseen problems along the way. Now I just decided to give up on it, I already wasted 30 euros on the block and if I really wanted it to work I'd have to find a bigger DIN size box and start over, as the box I have is a little too small at the bottom. In the end I would probably end up with a rig that gets stuck at some point in use causing a serious headache, which seems to be the trademark of Made in Mike's Garage.

So, fuck innovation, I've now switched to well known to work- style;


It simply looks good there don't it? :) Now I will have to rig up a cover plate to fool the thieves, as in Finland, it's essentially a guarantee to get your car robbed if you place a screen in plain sight. The screen is only hold by the piece of cardboard as of now, will attach it the next time I'm at the garage. I might engineer a pivot mechanism in the bottom as I remember that the screen didn't look that good when viewing from an angle.

After that's done, I will renew the LEDs in the steering column switches as the ones I installed before burnt up in a flash. Then I will start rigging up the stuff to the boot, can't wait to fuck it up! ;)

12/11/2012

Screens here

Okay, I got the screen from e-ville.com yesterday, hooked it up to my DC adapter to make sure it's working, and hell yeah it is! Superdope. It's actually quite big as well, the frame is 2 DIN sized, so that's nice. The contrast of the screen doesn't work when you look at it a big angle, and the resolution could be better, but for the price (35€) it's magnificent. I don't need any better than that with my XBMC XBox.


So looks like I'm getting my to my goals here; all my music (over 10 GB), whole seasons of series and movies, hundreds of games and all that for the price of less than a regular Pioneer deck. Successs!

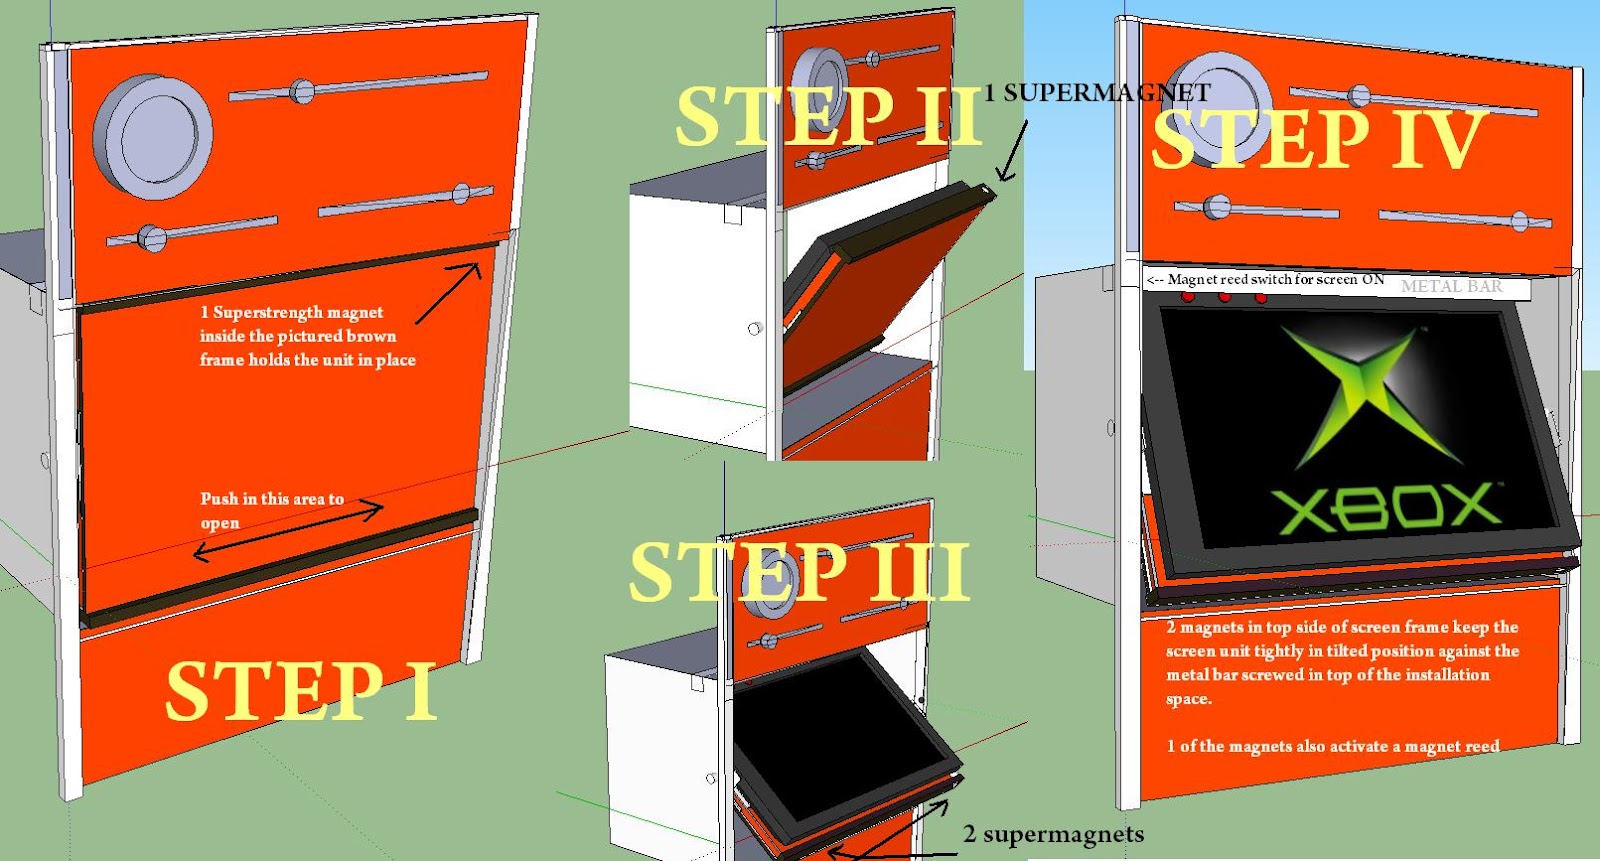
I was bored one day so I drew in some 3d plans on how to hide this baby from the thieves. ;) Unfortunately the frame is rather good option as well, it fits in the hole in my dash just perfect... Will have to consider these.


So check out later this winter when I install it!
 

Also, I've been superbusy changing engine to my winter/daily driver Fiat, bought it with a tiny leak in the head and it just grew bigger quite quickly, so I got my hands on a used engine for quite a bargain, 190€.

Brothers from another mother, left one is the supposedly properly working engine.

Fingers crossed it works, I'm on day 5 and it should be ready tomorrow. Very educating experience, never took an engine out of the bay, or worked with clutches, driveshafts and clutches. Also a super pain in the ass.

11/21/2012

Season 3

Right'o. The winter's knocking on the door again. That means its a new season of make it happen.. I feel positive that this year will be more eventful at the garage point of view because unlike last year, this time the garage is only a 20 minute drive away.

On the other hand, I'm back to school for this year so my incomes are a bit lower than what they used to be. And right now my life is very good, there was a time when it was too much trouble to bother going to garage at the end of the day. Not anymore though :)


So, I expect things to happen. I'm not looking to sell the Probe, I will keep building it to the next level. We've only just begun. ;> I'll do whatever it takes to learn to drive it like an extension of hands and feet.

 Right now the Probe is sleeping under a blanket, in our garage but I will probably have to wake her up for this Saturday, as I said I'd attend a car meet with Probe if the weather permits. Seems like it will, no freezing temps yet!


This year, my aim is to do whatever I want. I wasn't very happy driving the Probe this Fall, I missed my subwoofer and some of the appearance issues were really a sore in my eye.
Power Acoustik RCA Pre-Amp Equalizer (taajuuskorjain)


So...

I'm going to start by taking things apart a bit, and install the audio system. You probably know by now that I love me some gizmos, and I decided not to simply go and get a Pioneer player. That's too boring, and this new more exciting plan is actually gonna end up a lot cheaper!


7" Cheap-O screen (read a lot of positive reviews)
Right now I'm tyring to decide between two;

I have an old softmodded XBox, I ordered a 250GB harddrive for it, and running XBMC it makes the perfect media center. 

Pros are, it uses RCA connectors for video/audio so I would have ready connections for the amps in the back and the screen in the front.

Cons are that I would have to get an inverter, and the cheap ones don't really work that well (30-50€). I could buy a more expensive inverter which produces so called True Sine Wave to eliminate the problem, or I could buy a vehicle intended computer power supply and an adapter to eliminate the need for an inverter altogether. Problem, that route costs about 100-150€, which is way more than what I'm hoping for initial investment. Also, the XBMC dashboard/gui for the XBox, while amazingly good product, doesn't have the cool stuff that the option #2 has...

My dusty Softmod XBox


Option #2;

Raspberry Pi, the 50 euro miracle
 There's this new somewhat exciting product I heard about from my teacher, it's called the Raspberry Pi. Maybe you've heard of it! It's essentially a credit card sized computer, only for the price of ~50€. It has a HDMI, WiFi, 2 USBs, 512MB RAM, it powers with 5V USB (smartphone charger, super easy to set up in car). It has an ARM processor so it can't take a Windows OS, but there's a few Linux distros, Android systems and whats exciting for me, the very new XBMC. It's the offspring of the one my console has, but it's gone lightyears ahead. There's stuff like Spotify, Youtube, Internet browsing, very good looking user interface, equalizer... Sounds good right? Especially since my smartphone can share its 3G connection over Wifi.

A blade has two edges, and on a cheap blade at least one of them SUCKS. Unfortunately the RasbPi has a horrible audio 3,5mm connection with terrible sound quality, I hear. Through the HDMI you could get a better audio, but I would have it convert from digital to analog for my amps, and cheap convertors are not that great I hear.

As the plan is to actually SAVE money making something cool (as opposed to just going to the shop and buying a ready Pioneer unit), it's pretty much a blind shot. May be, that the HDMI adapter audio out is good enough, or maybe not.

---------------


Which one I'll choose? Probably the Xbox, since I already ordered a harddrive to it. But the Pi makes for a nice plan B, and perhaps an upgrade in the future. Xbox has games and better performance, fits nicer to a small screen and has a remote controller than can control the entire system, already have it.


So, next step is ordering the screen and installing it. Then comes the amps and the wiring, after which the systems can be tested. Then I can do more decisions, whether I need the RCA equalizer or not, to buy the inverter or try the Pi, and what not. And at some point I'll try to get a new set of speakers before next summer.

Oh, my good friend and confessed reader of the blog gave me a Xmas present early;


It's one of the best brands available, so that'll definately take the place of the cheap ass filter the previous owner has left me with. It's used and little ugly (dents and bends) but it's a definate upgrade to right now! Thanks Toni!

I might do an update after the car meet. Might be next month though, it'll be still a few weeks before I get the dough to do anything with my plans.

10/11/2012

Yo

So, it's been a while. I moved to the new garage a while back, except I've been pretty busy and it wasn't until two days I got everything in order there. There's quite a lot of people in the garage, and fitting my junk next to their 7 years collection on the shelves and all that is a bit hassle. Well, now it's behind, let's hope everything will work, truth is we aren't quite on the same planet as hobbyists but I hope we'll get along.

The new place is nice though, especially if we cleaned all the crap out so we'd have more space. That place is full of junk like TVs and scooters and a shitload of old car parts, most of them useless by the looks of them. Besides that, there's every tool available you can think of, so that's good.


So far, I've only drove my winter Mazda there, it's waiting for me to get motivated, the winter is coming and I need to put the Probe to sleep. I also repaired the front brake again cos' it started dragging again, disassembled it this time, now it works good, and did a wax job on the Probe.


I'm planning to go Sunday as there's some air in the rear brake now it seems, one of the calipers doesn't engage that well and it's making a weird noise in the corners. Also, the next month or two will pass by fixing the Mazda and I promised to repair a friends Toyota for some bucks. That's good, since I'm now unemployed, on a course to become an electricity mechanic (or whatever it's in english). I should get pretty good money from the Union once it starts running though, so it's not the end of days.

Anyhow, I'll hit back if something exciting happens. I've been a bit lazy on the blog for a while now, somehow while I'm working on the car I forget to take pictures in the heat of things, and thats the foundation of my blog so I guess thats why.

Still not winter! :))