So, I've been spenting quite a lot of time at the garage lately. As you know, I'm in process of installing the screen.
You've probably seen my first two desings of anti thief measumerents,
Mark I, the flipping screen. I abandoned this idea when I removed the cover plates of the DIN holes. There is a big bracket inside, cutting it would compromise the strength of the assembly and I would have to replace all the relays and wiring inside. Not worth it.
 Mark II
, the screen in a box. The idea was that the screen was attached from the rear base, middle section, to the plate leaning against the box in the picture. With those rails, it would move in and out. Unfortunately, the finished product didn't surpass my quality check; the rail would get stuck, the box was too tight at the inside end and excess amount of force was needed to operate. NEXT!
At this point, I decided I was simply going to put the screen in the 2 DIN space, after trying it and seeing how good it looked there;
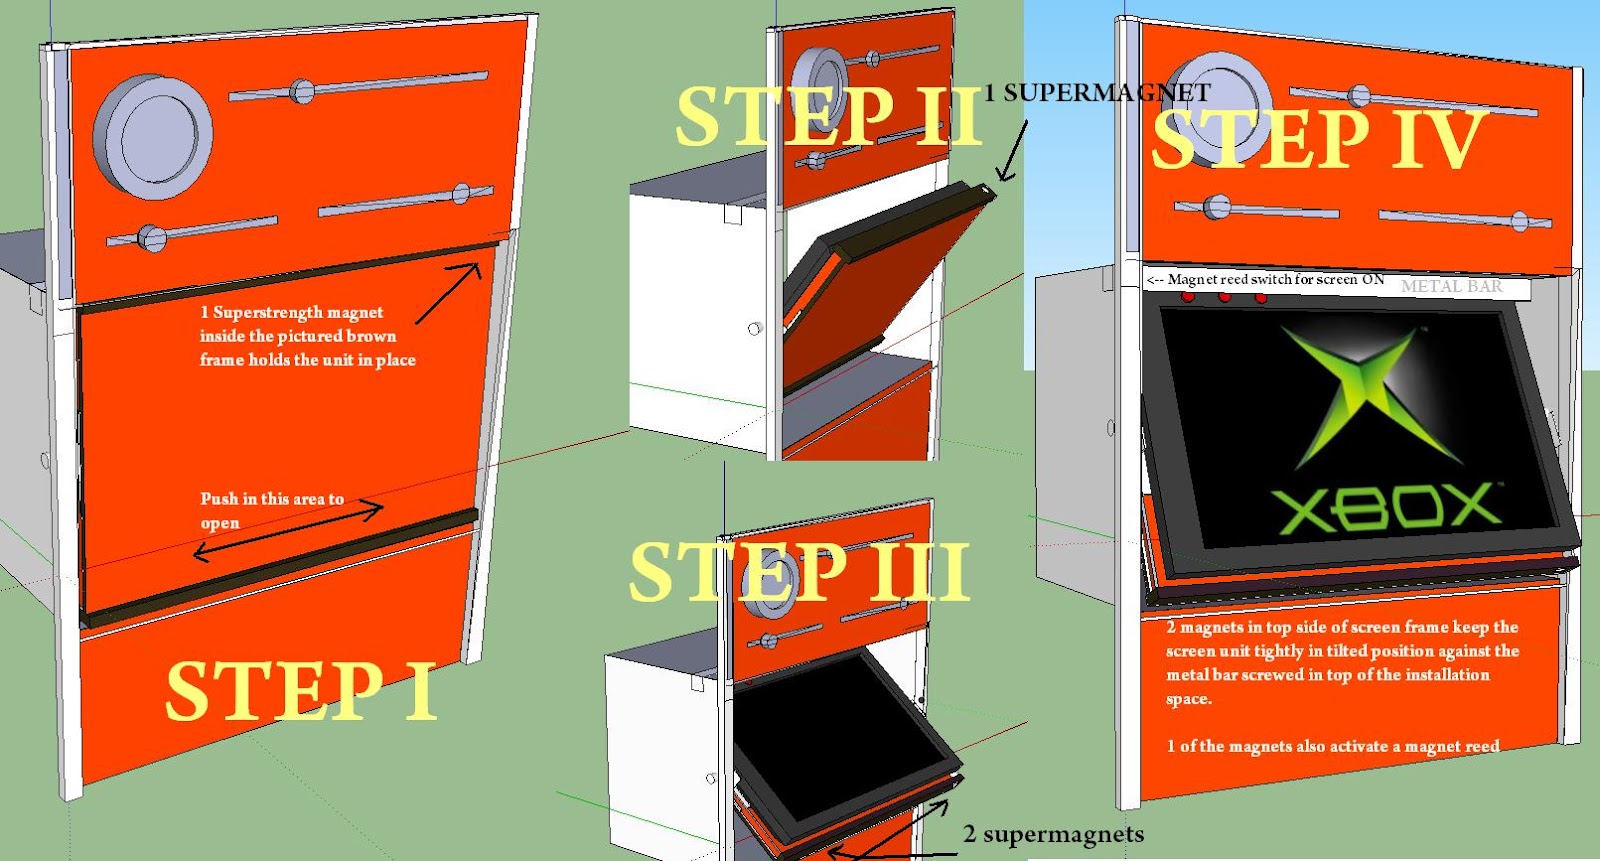
I wanted a cover plate to fool the thieves though, and there was a big gap between the body of the middle console and the frame of the screen. To this gap, I fabricated aluminium frames. I installed neodyne magnets inside the frames so that my new cover plate would just SNAP ON! ;)
I glued the magnets inside. In the other pic, you can see the tiny magnet easily holding a heavy screwdriver, so they're pretty powerful. :)
Here's the brackets installed,
After rigging some aluminium plate to the inside of the din holes so I could screw the screen on, I went with
Mark III and IV cover plates. I don't have pictures of those, as at this point I was getting quite frustrated and simply looking to get the job done.
Mark III was 2 DIN sized metal plates, joined with hinges from middle and held place with other hinges in the bottom. It would down and over itself in a neat pile. Or should've, but I didn't take into account that the hinges itself would raise the plate so much, that there would be big gaps all over, which would've looked stupid and not fool anybody. Besides, at this point, I found out that even the supermagnets couldn't do anything through 1,5mm of aluminium and 2mm of plastic. They barely held a small screw against the frame. So that was all for nothing.
Mark IV, I went back to basics. Just one simple 2 DIN size plate, hinged from bottom. It would be held up by a knob, which would be a switch. When you flipped the switch down, the plate would come down and the switch also powered the screen. This one I built and painted, but upon assembly I realized the screw heads holding the plate hinges to the frame of the screen, made it impossible for the hinges to close completely, leaving the plate open, now matter how I tried bending the plate, it just wouldn't look good.
So
Mark V came around, just a plate, no hinges no nothing, a simple U rail to hold it in place. At this point I was almost ready to pick up the grinder and cut the screen in half.
Suddenly, I came to find out that the little guy living inside me, who couldn't cut a straight line with a saw in junior grades, hadn't gone anywhere. Trying to cut a 2 DIN size plate which would even seem straight turned out impossible. After wrecking 2 perfect pieces of aluminium and one steel plate I just fucking gave up. :D
I melted some plastic with a soldering iron to holes I drilled (it fucking worked!) It's not perfect for a first try out, but to me it looks a lot better than the holes. Needs some paint though. I later found out this is an actual practice and not a new invention by yours truly.
Now I'm totally out of money, need some more aluminium rail to get it back to how it was before I drilled a thousand holes, so I expect nothing great to happen in two weeks. I should be getting some deliveries, though. ;)
So hear ye thieves, come and steal, I'm insured. Maybe I should attach a price tag to the screen to keep the thieves away, after all, this screen only cost me like 30 euros.
I will avoid fabricating items from now on, thank you for the lesson. ;)
although, I've planned the Mark VI already...